Table of Contents
Purpose
To formulate general specifications for terminal crimping operations to help relevant personnel understand crimping operations so that they can take the correct approach and achieve qualified terminal crimping.
Scope
Applicable to the operation and production of terminal crimping procedures in production workshops.
Definition
Crimping is a type of processing technology for electrical wiring.
When connecting metals to each other, it is not necessary to melt the metal for welding.
The core conductor can be directly pressed into the terminal metal, so that the metal part of the terminal and the conductor of the wire are deformed and combined together (permanent connection).
This connection can obtain better mechanical strength and electrical connectivity.
Compared with welding connection, it can withstand more severe environments, such as connections in high current situations, etc.
Terminal classification:
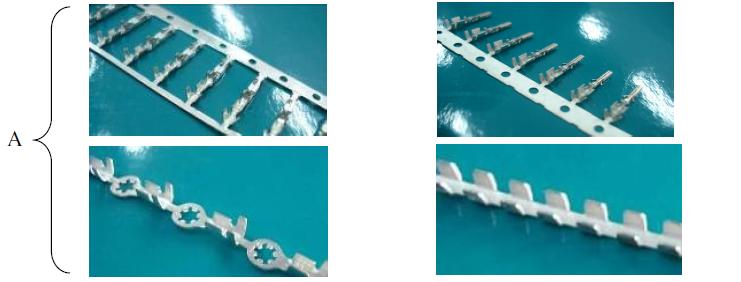
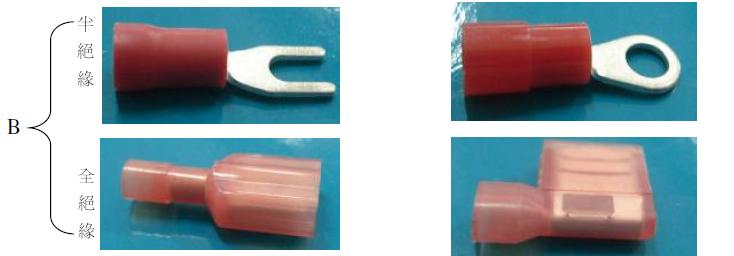
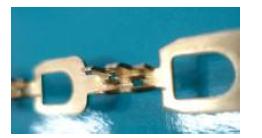
According to the location and function of the terminal processing point, there are three types of classification:
Terminals without insulation support:
Terminal with insulation support :
IDC Terminal:
Names and functions of various parts of the terminal
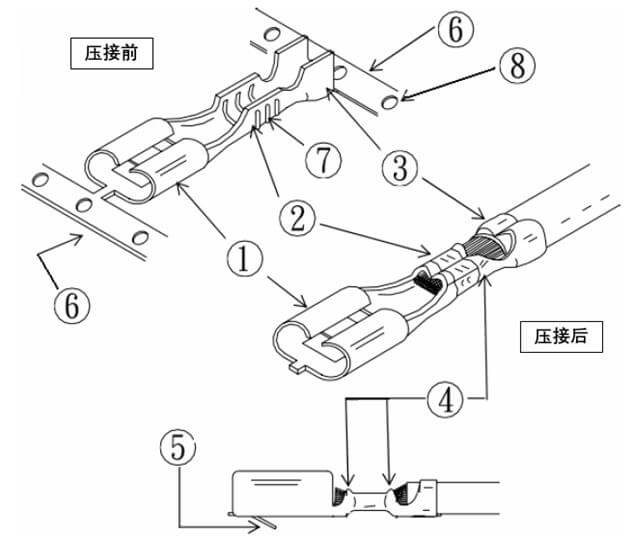
(1). Contact part Direct contact part between conductor and connector.
(2). Front clamp Important part of connecting terminal and wire, and part that is permanently connected to the conductor of wire.
(3). Rear clamp Important part of wrapping wire insulation, which keeps the terminal with certain pressure and suitable appearance.
(4). Bell mouth Wedge-shaped part during crimping, protecting the core wire and reducing damage to the core wire due to crimping.
(5). Spring clip Prevents the terminal from being pulled out when inserted into HOUSING.
(6). Strip Terminal itself connected, easy to store, used for automatic feeding during riveting.
(7). Groove printing makes the contact between wire and terminal closer after riveting.
(8). Feeding hole The crimping part of the terminal machine claw, used for terminal feeding.
Responsibilities:
User department:
responsible for the purchase application, acceptance and use of equipment/tools, abnormal repair application and daily maintenance.
Engineering Department:
Prepare terminal crimping operation instructions and process guidance documents
Quality Department:
Define the standard quality requirements for terminal crimping and supervise the effective implementation of terminal crimping requirements
Work procedures:
Before production
Wear a work badge and take safety precautions.
Perform equipment safety inspection:
⑴ Turn off the equipment switch, cover the safety cover, and step on the foot switch 3 times without installing the mold to ensure the effectiveness of the equipment switch. It will not operate in the case of power failure;
⑵ Turn on the equipment switch, cover the safety cover, and step on the foot switch 3 times without installing the mold to ensure the effectiveness of the equipment switch and the safety cover circuit conduction function. The equipment operates normally in the case of power on;
⑶ When the power is on, open the safety cover, and step on the foot switch 3 times without installing the mold to ensure that the power-off function of the safety cover is effective. When the safety cover is opened, the equipment will not operate;
Check whether the equipment is in good condition according to the requirements of the terminal machine daily inspection record sheet.
If not, fill in the equipment maintenance application in time and stop production, and report to the maintenance department for maintenance.
After maintenance, the equipment safety inspection needs to be carried out again, and the foreman shall confirm it.
Check whether the required terminals, sealing plugs and branches on the workstation are consistent with the hand pressure card.
If not, please notify the on-site material staff to change or add materials, and check whether the first piece qualified label is attached to the outer packaging of the material.
If not, implement the “Product Identification and Traceability Procedure”.
And confirm that the above materials and documents are in place.
At the same time, the workstation should be equipped with the first piece qualified label and product label for use in the first piece inspection and identification.
If not, notify the material staff to provide it.
In production
Upper mold:
correctly install the mold required for the current production on the manual crimping machine.
(1) After completing the equipment safety inspection, equipment integrity inspection and other information confirmation, the team leader needs to check the inspection content again and allow production only after confirmation.
(2) Determine the terminal model that needs to be crimped manually.
(3) Determine the mold number and crimping parameters of the crimping mold used based on the terminal model.
(4) Notify the production technician to install the mold.
(5) Before installing the mold, the production technician must disconnect the power supply of the equipment, open the safety cover, keep his feet away from the pedal, and then correctly install the mold on the manual crimping machine.
(6) After the mold is installed, cover the safety cover and press it with your hands to make sure that the mold is completely installed.
Manual crimping parameter setting:
Adjust the correct parameters for the current crimped terminal on the manual crimping machine, and ensure that the power supply of the equipment is disconnected, the safety cover is opened, and the feet are away from the pedal.
For the 8-ton crimping machine, the foreman needs to monitor the entire process in real time and stop any illegal operations in time.
- Adjust the manual crimping machine and crimping mold based on the queried crimping parameters. For specific operation methods, see the relevant operation instructions of the manual crimping machine.
Installing terminals:
Install the terminals into the corresponding molds on the manual crimping machine, ensuring that the power supply of the equipment is disconnected, the safety cover is open, and the feet are away from the pedals.
For the 8-ton crimping machine, the foreman needs to monitor the entire process in real time and stop any illegal operations in time.
(1) Chain terminals: Take the correct terminals according to the hand pressure card and place the terminals on the terminal bracket on the manual crimping machine.
Pull the terminals apart and pass them through the terminal guide slots and place them correctly into the mold as required.
(2) Loose terminals: Take a terminal and place it correctly into the mold as required.
Taking terminal blocks:
Place the terminal blocks to be crimped (including single crimping, parallel crimping, and sealed crimping) on the workbench as required to facilitate crimping by the manual crimping machine.
(1) Determine the correctness of the product part number, terminal block, wire type, wire diameter, color, length, and stripping length according to the hand crimping list.
Use of pressure monitor:
Confirm the monitoring range of the current crimped terminal on the pressure monitor.
(1) For equipment with pressure monitors, the monitoring settings of the monitors need to be adjusted.
(2) When starting a new crimping operation, the monitoring range of the monitor needs to be reconfirmed (after the first piece inspection is completed).
Manual Crimping:
After the equipment parameters are set, operate the equipment according to the relevant manual crimping machine operating instructions to perform the first piece crimping.
After inspection and confirmation, start manual batch crimping of terminals.
(1) After all materials are prepared, turn on the power of the equipment, cover the safety cover, perform a test press according to the queried mold crimping parameters, and perform the first piece inspection operation. Refer to the “Assembly Area Manual Crimping Process Operation/Inspection Guide”.
(2) Check whether the terminal crimping is qualified by comparing the terminal crimping parameters on the parameter server and the “Assembly Area Manual Crimping Process Operation/Inspection Guide”.
(3) If unqualified, the equipment parameters must be readjusted (if necessary, ask the mold room staff to help adjust the mold) until it is qualified and enter the crimping record.
(4) Fill in the first piece qualified label, hang it on the branch line, and make various corresponding records to start formal batch production.
- Keep records of random inspection and final inspection during operation. (See “Manual Crimping Process Operation/Inspection Guidelines for Assembly Area”).
Terminal placement:
The crimped terminals are bundled, wrapped, etc. according to a certain quantity and specific requirements, and placed at a designated location (wire rack, turnover box, etc.).
- Arrange the crimped terminals according to the specified quantity, hang the filled-in product labels, and bundle them with special bundling tools (CABLE branches can be placed in turnover boxes without bundling).
(2) Wrap the terminals (except the terminals on the CABLE) and the exposed copper wires (stripped for subsequent operations) with special packaging materials. No terminals or copper wires are allowed to be exposed outside the special packaging bag.
(3) Place the terminals at the designated fixed point according to the first-in-first-out principle.
Return the mold:
When the manual crimping is completed, the foot immediately leaves the pedal, then turns off the power of the equipment, opens the safety cover, removes the mold, and returns it to the person responsible for the mold.
(1) Confirm that the crimping task corresponding to the mold has been completed.
(2) Turn off the power of the equipment, open the safety cover, and then remove the terminal from the terminal guide slot correctly as required, fill in the terminal scrap form truthfully and ensure that the number filled in is correct. Return it to the terminal fixed point.
- Remove the mold from the manual crimping machine, close the blade, and return it to the mold room.
- If there is any problem with the mold, report it to the mold custodian in time, and attach a sample of the problem and a simple text description.
Terminal crimping inspection acceptance criteria
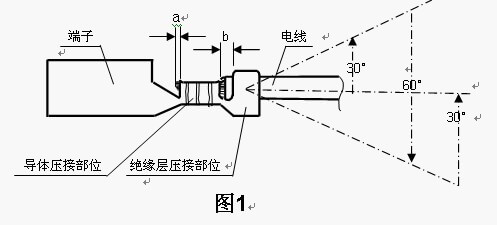
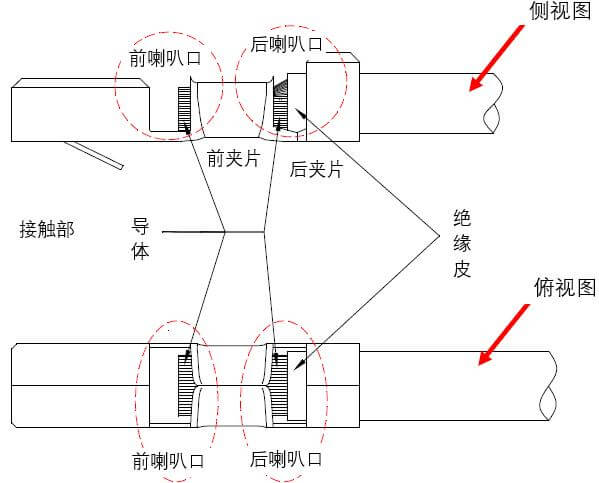
The area between the front clip and the rear clip is called the “rear bell mouth” area, and the area between the contact part and the front clip is called the “front bell mouth” area.
Crimping requirements for the “front bell mouth” area and the “rear bell mouth” area:
The conductor needs to be fully pressed into the front clip, the conductor cannot be forked out, the conductor cannot be broken or crimped in place, and the conductor in the “front bell mouth” area is exposed from the front clip by about 0.2~1.0mm, the functional matching part cannot be touched, and the core wire is flush with the edge of the front clip.
The conductor and insulation skin in the “rear bell mouth” area are both visible, and the two occupy about half each.

The end face of the wire should be flat and perpendicular to the axis of the wire. The conductor and the insulation layer at the end face should be on the same plane.
The wire should not be bent at the connection, and the end of the wire should be visible in area a as shown in Figure 3.
The connection between the terminal and the wire should be firm and should not be damaged or detached under the specified tension.
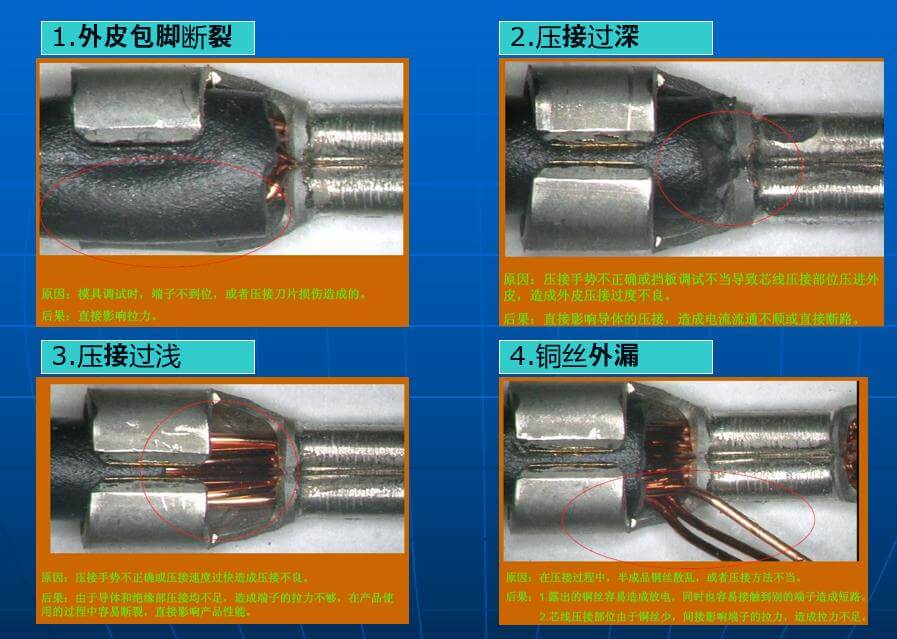
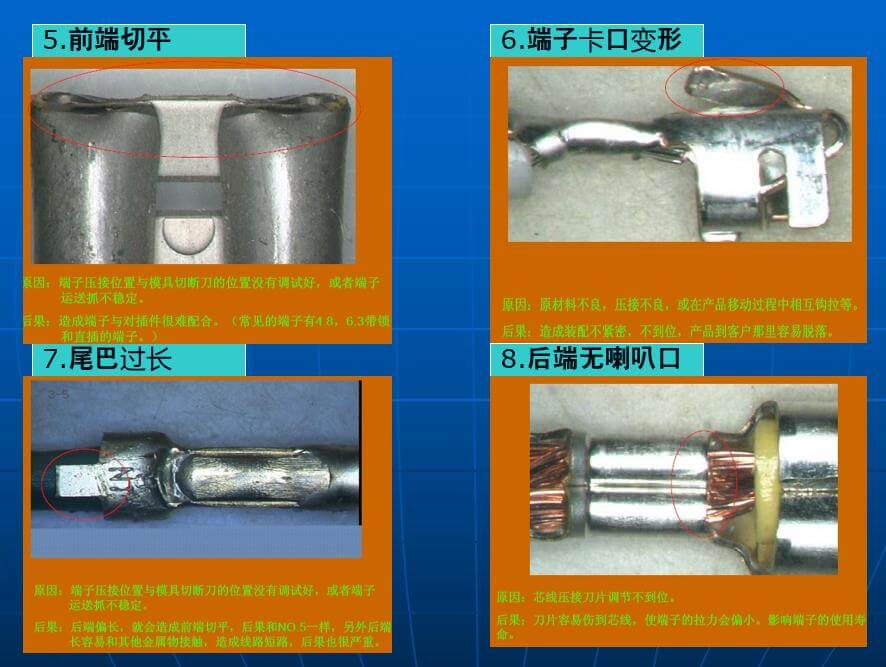
Classification and causes of bad terminals
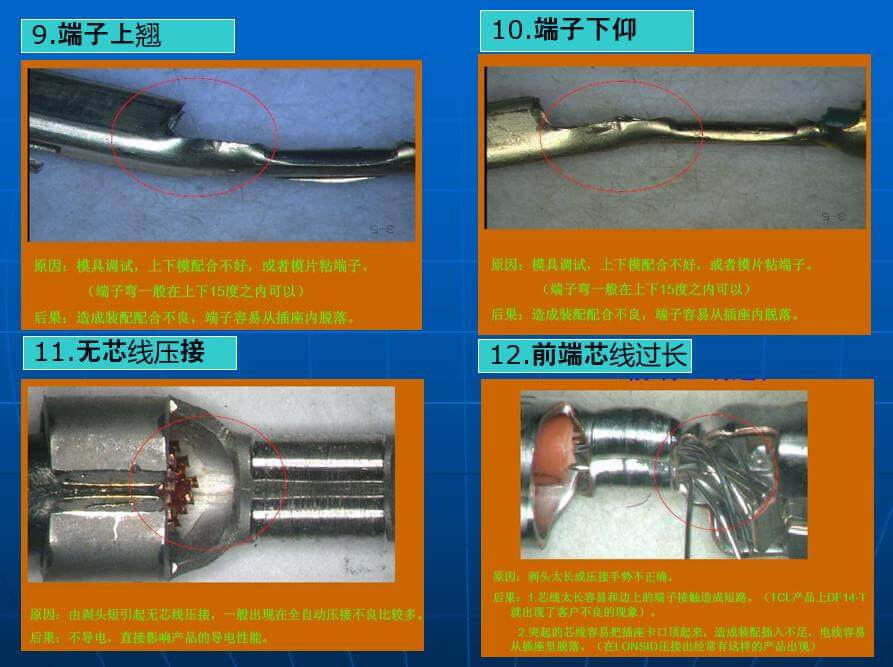
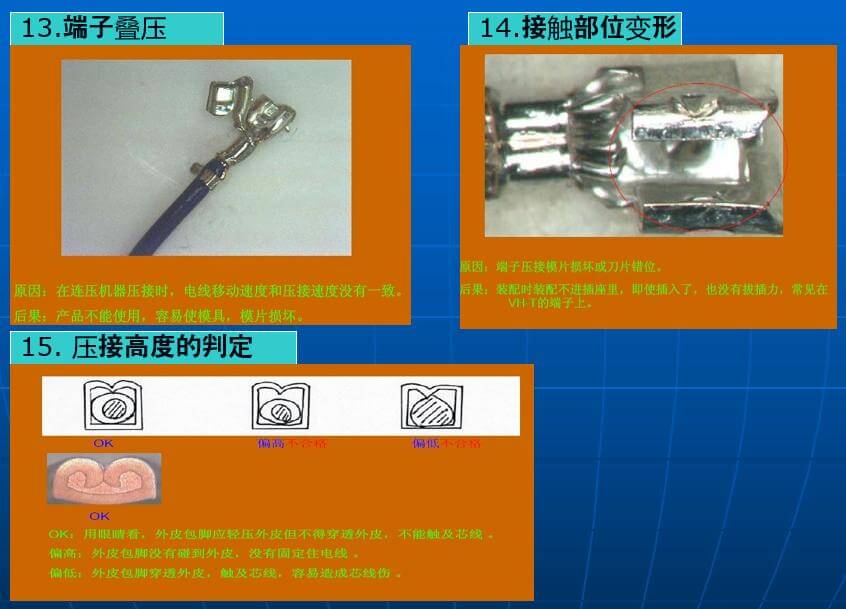
Maintenance process after the terminal mold is defective
When the terminal mold has a problem, the employee reports it to the manager (team leader or above)
The manager contacts the equipment maintenance personnel at the manufacturing site
The equipment maintenance personnel will arrive at the equipment that needs maintenance within 5 minutes
The equipment maintenance personnel will repair the equipment according to the situation, and simple debugging will be carried out immediately.
If the blade needs to be replaced, it is necessary to confirm with the supervisor, and replace the blade after confirmation. At the same time, keep a record on the spare parts in and out of the warehouse.
Try to meet The production site requires that if a special accessory is damaged and there is no spare part, report it immediately and contact the logistics dispatch department for purchase.
After the equipment is maintained, it is necessary to fill in the maintenance record form and confirm it with the team leader. The statistician will enter it into the computer for archiving every day.
The maintenance of the terminal mold should be from simple to complex. After accurately finding the fault point of the equipment, repair the fault point and do not artificially expand the fault point.
After repairing the equipment and mold, the workbench must be restored to the condition before the repair, and garbage is not allowed to increase on the workbench.
Cutter mold management
A management table must be established for the knife mold, and records must be kept for use, maintenance and storage.
Generally, the cumulative service life of the heat-treated knife mold is required to be 300,000 times;
after each batch of crimping is completed, the number of crimping times shall be recorded in the “Knife Mold Management Manual” according to the production quantity;
if quality abnormalities are found during production, and the knife mold is confirmed to be damaged, deformed, etc., the knife mold must be replaced immediately.